
Introduction
It is challenging to take apart and re-assemble the Brompton BWR hub. It is a complex system with quite a number of parts in it. In particular you have never done it before and you don’t have an experience mechanic holding your hand.
However it can be done as long as you do your research thoroughly, do your job with patient and carefulness. It is possible to take the hub apart, clean, lubricate, re-assemble and get everything working fine and smoothly.
The complete overhaul of the hub is a relatively long process so I divide this into two parts. This is the disassembling and cleaning part. The next one would be the assembling part.
Do I need to overhaul my hub?
Just as a car engine, you don’t need to overhaul it on a regular basis. According to Sheldon Brown’s web page, “Sturmey-Archer hubs have been designed and built to give a life-time of trouble-free service”. For Sturmey-Archer newer hubs like the BWR, they use a more durable NLGI 0 grease (liquid like grease) instead of oil. This hub can be considered to be maintenance free for a lifetime.
Unless your hub freezes up, having suspicious jamming indications or giving some abnormal noises, you don’t have to do it. Some would prefer to overhaul the hub after it has not been used for a long time. The lubricant could be dried up. The last but not least, if you have a strong interest to try this hands on.
Special tools
You’ll need a 16mm cone wrench to handle the cone.
It would be nice to have a Sturmey Archer Ball Ring Spanner. Though some people just use a puncher to knock the Ball Ring loose.
An axle vice or a small table bench vice could be handy for holding the hub.
Disassembling sequence
Step 1 Prepare the wheel
Take your rear wheel out from your Brompton.
Step 2 Take out the sprockets
Secure the wheel by clamping the axle on a table vice. Right side (driving side) upward.
![]() Clamp on the flat part of the axle. Do not clamp on any part of the thread.
Clamp on the flat part of the axle. Do not clamp on any part of the thread.
Using a small flat screwdriver to take out the Sprocket Circlip, then take out the sprockets in the following order.
- HSL721 Sprocket Circlip
- HSL894 13T Sprocket
- HMW542 Sprocket Spacer
- HSL968 16T Sprocket
- HSL967 BWR Sprocket Dustcap

![]() It would be helpful to put the parts down on a cardboard in the order of they were taken out.
It would be helpful to put the parts down on a cardboard in the order of they were taken out.
Step 3 take out the left side nuts and cone
Turn the wheel to the left side (non drive side), secure the axle in the bench vice.
![]() Remember NOT to clamp on the threads.
Remember NOT to clamp on the threads.
Use a 16mm cone wrench to hold the cone and use a 17mm wrench to loosen the lock nut. Then take out:
- HMN407 Cone Locknut-6.4mm
- HMW129 Spacing Washer 1/8”
- HSA101 Cone
Step 4 loosen the ball ring and take out the hub core
Turn the wheel back to the right side.
Use the Sturmey Archer Ball Ring Spanner to loosen the ball ring.
You might need a bit of slight knocking on the handle of the spanner to loosen it.
Unscrew the ball ring and take the whole hub core out.
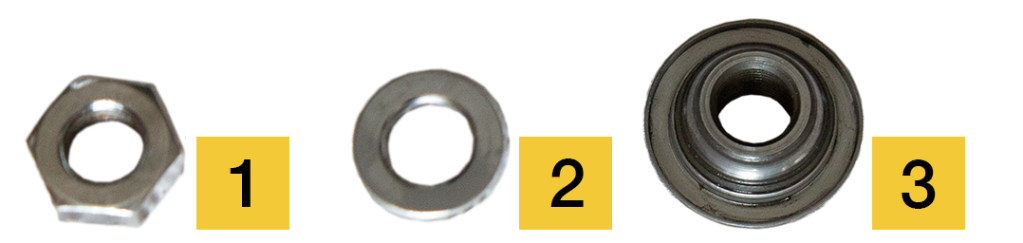
Step 5 take out the right side nuts and cone, spring and spring cap
Secure the hub core in the bench vice.
Use a 16mm cone wrench to hold the cone and use a 17mm wrench to loosen the lock nut. Then take out:
- HMN404 Cone Locknut-3.2mm
- HMW147 Cone Lockwasher
- HSA101 Cone
- HSA129 Clutch Spring Cap
- HSA128 Clutch Spring

![]() Please note that this locknut (HMN404) is only half thin as the locknut (HMN407) on the other side.
Please note that this locknut (HMN404) is only half thin as the locknut (HMN407) on the other side.
Step 6 take out the driver, ball cage and ball ring
Continue to take out:
- HSA800 BWR Driver Assembly
- HSA438 Ball Cage Assembly
- HSA799 NIG Ball Ring-Satin

The driver assembly’s pawls might be in the way and you have to take all three out together. Then hold the pawls back and separate the three parts.
You might want to hold the ball ring and turn the driver clockwise to let the actuator plate catches the pawls. So that you can take each part out one by one.
Step 7 take out gear ring assembly
Continue to take out:
HSA798 BWR Gear Ring Assembly

![]() Be careful not to flip this part upside down unless you are holding the pawl pins with your fingers, because they can drop out easily. Then the pawls and the pawl pins will follow too.
Be careful not to flip this part upside down unless you are holding the pawl pins with your fingers, because they can drop out easily. Then the pawls and the pawl pins will follow too.
![]() If the pawl springs drop on a dark workshop floor, you’ll spend some time looking for them. They are small and almost invisible at a distance.
If the pawl springs drop on a dark workshop floor, you’ll spend some time looking for them. They are small and almost invisible at a distance.
Step 8 take out the sliding clutch and axle key
Continue to take out:
- HSA536 Sliding Clutch
- HSA295 Axle Key
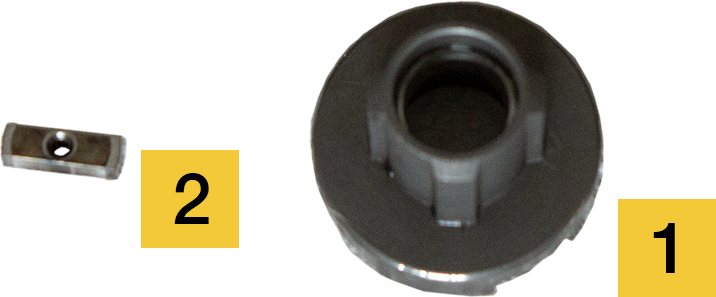
By now you should left only the BWR Axle/Planet Cage/Pinion Assembly on the vice.
Step 9 Disassembling the Axle/Planet Cage/Pinion Assembly

Gently tap the assembly on the bench, let the planet gear pins (1) to slide out.
Take the pins (1) and gears (2) out.
Take the pawl spring circlip (3) and the pawls (4) out.
Use allen key to unscrew the screws (5) securing the top plate (6) on the assembly.
![]() The screws are pre-treated with thread-locker. If they are too tight, you could try to use a soldering iron to apply heat on the screws then try again.
The screws are pre-treated with thread-locker. If they are too tight, you could try to use a soldering iron to apply heat on the screws then try again.
Take the axle / sun gear (7) out.
Step 10 Disassembling the gear ring assembly
Use a small flat screwdriver to push the pin (1) up from the underside, then slide the pin out with a plier or a pair of tweezers.
Carefully take out the pawl (2) with the pawl spring (3).
Note the orientation of the pawls and pawl spring.

Step 11 Disassembling the driver assembly
Use a flat head screwdriver to take out the actuator plate (1) gently.
Take out the circlip (2) and the pawls (3).
Using a large flat head screwdriver to take out the outer dust cap (4).
Take out the ball cage assembly (5).

![]() Make sure you do not deform the actuator plate. If the side plates open up a bit too much, they may not function properly or even break after re-assemble.
Make sure you do not deform the actuator plate. If the side plates open up a bit too much, they may not function properly or even break after re-assemble.
![]() The metal of outer dust cap is not that strong, excessive force could deform it. Using a internal bearing puller to pull it out would be better.
The metal of outer dust cap is not that strong, excessive force could deform it. Using a internal bearing puller to pull it out would be better.
Step 12 Take out left side dust cap and ball cage
Using a large flat head screwdriver to take out the outer dust cap from the hub shell on the wheel.
Take out the ball cage assembly in the hub shell.
Step 13 Cleaning
I have been using kitchen towel to clean the parts while I am taking them out. Not really environmental friendly but it make the whole process less messy.
Then clean all parts using your favourite degreasing solutions.
It would be nice if you have an ultrasonic cleaner. Just use 1:1 diluted “Simple Green” and ultrasonic clean for 15 minutes.
![]() It will be good to do your cleaning by grouping the parts. So similar parts like all the pins will not be mixed up.
It will be good to do your cleaning by grouping the parts. So similar parts like all the pins will not be mixed up.
Rinse and dry the parts
![]() Rinse and dry the parts as soon as possible, you don’t want the parts to get rusty.
Rinse and dry the parts as soon as possible, you don’t want the parts to get rusty.
Epilogue
Yes, the procedure and the number of parts seems overwhelming. But once you get familized with it. It is not that complicated. It can be done easier than you thought.
I am doing another part for assembling the hub back together. I’ll share with you in my next post.
